Quick principles before you start
- Place electrodes on clean, dry, intact skin — remove lotions and oils first.
- Keep pads at least 1 inch (≈2–3 cm) apart; many clinicians recommend a wider gap for larger pads and deep pain.
- Do not place pads over the eyes, mouth, front of the neck, across the chest over the heart, on broken skin, or directly on the spine. Avoid placement over implanted electronic devices unless cleared by a clinician.
- Start with low intensity and increase slowly until you feel a comfortable strong tingle (TENS) or a mild muscle contraction (EMS), never pain.
Expert note (physiotherapist): Good electrode contact is as important as pad position. If a pad peels or the sensation is uneven, reposition and press firmly for full contact.
How to arrange pads – general setups
Most consumer TENS units use 2 or 4 pads. Below are standard arrangements for single- and dual-channel units.
- Two-pad single channel — place one pad above and one pad below the painful area, or one on each side of the pain. This creates a current path through the target tissue.
- Four-pad (two-channel) configuration — creates two independent current circuits. Use channel A for one painful region and channel B for another, or place two pads around the area in a cross or square to broaden coverage.
Expert note: When treating a localized joint (e.g., knee), a four-pad square that surrounds the joint often gives broader coverage than two pads placed on the same side.
Common placement patterns (practical, step-by-step)
Below are clinically recommended placements used widely in practice. For each region I indicate one practical two-pad option and a four-pad alternative.
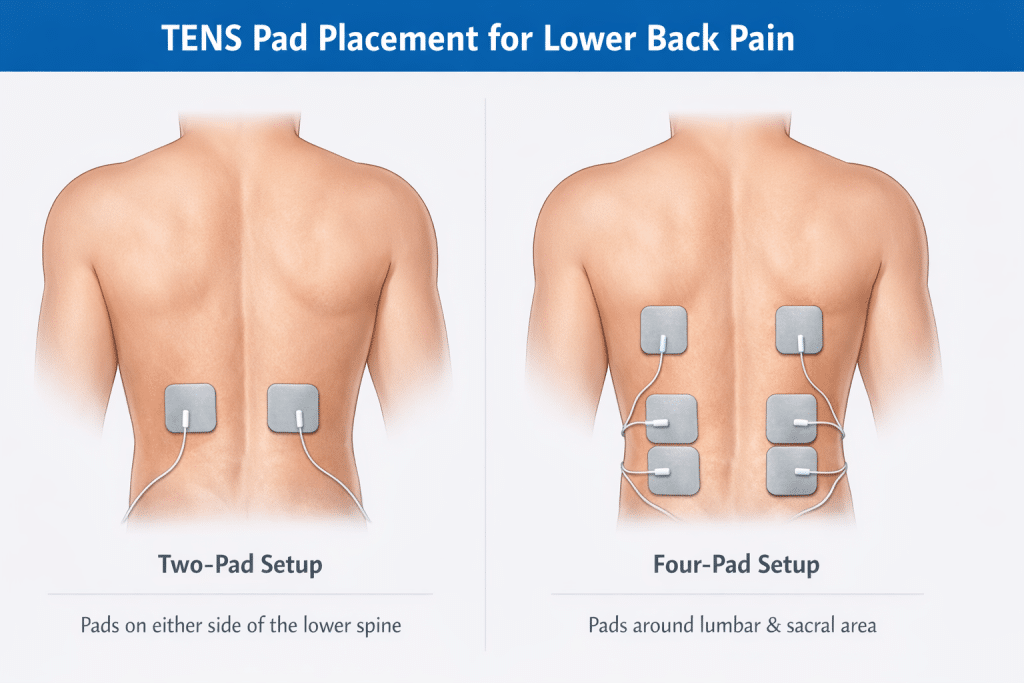
Lower back (lumbar pain)
- Two-pad: Place one pad on each side of the painful lumbar region (paraspinal), about 1–2 inches lateral to the spine — do NOT place over the spine.
- Four-pad: Two pads on either side of the painful area and two lower down on the sacral/lower lumbar region to create two circuits.
Expert note: For lower back pain many users find high frequency (80–120 Hz) useful for short-term acute relief, and low frequency (2–10 Hz) for more sustained effect in chronic conditions — experiment under guidance.
Neck / Upper trapezius (neck pain, tension)
- Two-pad: Place pads on the muscle belly of the trapezius (top of shoulder area), avoiding the front of the neck and cervical spine.
- Four-pad: Two pads on the upper trapezius and two on the posterior shoulder blade to broaden relaxation.
Caution: Never place pads on the front of the neck or over carotid arteries.
Shoulder (rotator cuff / shoulder pain)
- Two-pad: One pad just posterior to the shoulder joint (under the acromion) and the other on the upper arm or lateral shoulder.
Knee (patellofemoral / osteoarthritis)
- Two-pad: One pad above the knee on the quadriceps, the other below the knee on the hamstring side or calf (not directly over the kneecap).
- Four-pad: Two pads above and two below placed diagonally to encircle the joint for better coverage.
Hip / Gluteal pain
- Two-pad: One pad over the trigger point in the gluteus medius or maximus, the other pad placed laterally on the hip or lower back to form a comfortable current path.
Calf / Shin (muscle strains)
- Two-pad: One pad above the painful area and one below (along the same muscle). Four-pad placement can target both anterior and posterior compartments.
Elbow (tennis/golfer’s elbow)
- Two-pad: One pad on the forearm flexor/extensor muscle belly near the elbow, the other pad a few cm further down or up the forearm.
Abdomen (visceral pain and menstrual cramps)
- Two-pad: Place pads lateral to the painful area — do not place across the pregnant abdomen; seek clinician advice for pregnancy. For menstrual cramps, recommend peripheral (lumbar or sacral) strategies rather than direct high-intensity abdominal placement.
TENS vs EMS placement differences
- TENS (pain relief): Place pads to surround/over the painful area or to stimulate the nerve supplying that area. Sensation should be a non-painful tingling.
- EMS (muscle stimulation): Pads are positioned over the motor points or muscle belly to elicit visible contractions — pad spacing and orientation should follow the muscle fiber direction for even contraction. Use EMS programs and lower frequencies intended for muscle activation (typically 35–50 Hz and appropriate pulse width).
Expert note: For combined TENS/EMS units, use TENS modes for symptomatic pain relief and EMS for muscle re-education or strengthening — do not use EMS to treat acute pain without professional guidance.
Session parameters: frequency, intensity, duration
- Frequency (Hz):
- High frequency (approx. 80–120 Hz) — commonly used for acute pain and gate control analgesia.
- Low frequency (2–10 Hz) — often used to induce endogenous opioid release for chronic pain.
- Mid frequencies (30–50 Hz) — may be used for muscle stimulation/relaxation.
- Intensity: Increase slowly to a comfortable, effective level. TENS should produce strong but comfortable tingling; EMS should produce visible, non-painful contractions.
- Duration: Typical sessions range 15–60 minutes depending on device guidance and condition. Some services recommend up to 60 minutes, up to three times daily for short-term relief. Do not fall asleep with TENS on.

I wasn’t sure if this would really help, but after a few days of using it, I can honestly say it works. The different modes feel very close to a real massage, and the intensity levels make it easy to adjust depending on how sore I am. I mainly use it for my neck and lower back, and the pain relief is noticeable after each session. The battery lasts a long time, and it’s small enough to carry in my bag. If you have muscle pain and want something practical and effective, this is definitely worth trying.


Absolutely worth it, quick relief on sore muscles and joints, easy to set up, and feels high quality. Really impressed!

I’m really happy with this TENS machine. It provides noticeable pain relief, especially for my neck and lower back, and the different modes make it easy to find a comfortable setting. The battery lasts well and it’s compact enough to use at home or take to work. Great quality for the price, I would definitely recommend it.

Troubleshooting common placement problems
- Uneven sensation: Check pad adhesion, reposition, press edges down; ensure lead plugs are fully seated.
- Pads not sticking: Clean skin properly, replace pads if gel has dried out.
- Skin irritation: Stop use; allow skin to recover. Try hypoallergenic pads or rotate pad positions. If irritation persists, consult a clinician.
Contraindications and safety reminders
- Do not use if you have an active cardiac pacemaker or implanted defibrillator unless cleared by your cardiologist; electromagnetic interference can be a concern. Use caution and seek specialist advice.
- Avoid the front of the neck, head, eyes, mouth, and broken skin.
- Pregnancy: TENS use in pregnancy is sometimes used in labour under supervision, but avoid certain placements and consult your obstetrician or midwife.
Practical checklist before each session
- Inspect pads and leads.
- Clean and dry skin.
- Connect leads to pads and device while machine is OFF.
- Place pads per recommended pattern; press firmly for full contact.
- Power on, select mode, set timer.
- Increase intensity slowly for each channel.
- Monitor comfort; stop if adverse sensations occur.
- Power off before removing pads and store pads on backing film.