1) Unboxing and inspection
- Remove the unit, electrode pads, lead wires, charging cable (USB-C/Type-C on supported models), and the user manual from the box.
- Inspect the device, pads and wires for visible damage. Do not use a damaged device or accessories — contact support (info@tensmachines.co.nz) for replacement.
- Charge the unit fully before first use following the manufacturer’s charging instructions. For Type-C devices use the supplied cable or a reputable USB-C charger. A full charge ensures stable output and longer session times.
2) Read the manual and learn the controls
- Read the quick start and safety sections of the supplied manual. Every model differs slightly — modes, timer settings and intensity controls can vary.
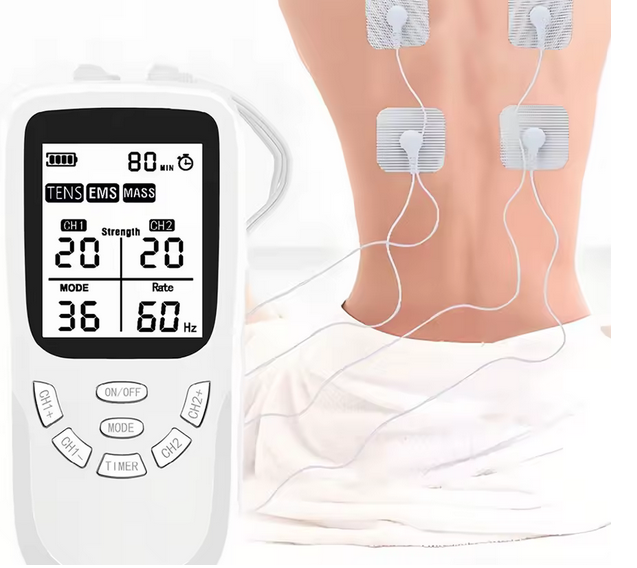
- Locate the power button, mode/program selector, intensity controls (per channel if dual-channel), channel on/off toggles, and the timer. Confirm how to turn channels on/off independently.
3) Prepare your skin and electrodes
- Clean and dry the treatment area with plain soap and water. Remove oils, lotions or heavy creams — they reduce adhesion and may interfere with electrical contact. Do not use alcohol immediately before application if the pads’ manufacturer advises against it (alcohol can dry pads prematurely).
- If hair interferes with adhesion, clip (do not shave) a small patch of hair to improve contact and comfort.
- Peel pads from their protective film and inspect the gel surface. If the gel is dry or damaged, replace the pad set.
4) Connect the leads
- Plug the lead wires into the device. If your unit is dual-channel, there will be two sets of outputs (Channel A and Channel B).
- Attach the other ends of the lead wires to the electrode pads. Ensure secure connections — loose plugs can make the stimulation feel uneven.
5) Place the pads – basic guidelines
- Position pads on healthy, intact skin near the painful or targeted muscle area. Typical placements:
- Lower back: on either side of the spine (not over the spine itself).
- Shoulder: around the deltoid or trapezius, avoiding the front of the neck.
- Knee: above and below the knee joint on the quadriceps and hamstring sides.
- Neck: avoid placing pads on the front of the neck or too close to the carotid arteries — use only with clinician approval.
- Keep pads at least 2–3 cm (≈1 inch) apart (or more) so current flows between pads and covers the target area. Do not place pads directly over the heart, across the chest, on the front of the neck, on the head, on broken skin, or over implanted electronic devices (e.g., pacemakers).
- For dual-channel use you can treat two separate body areas simultaneously (e.g., left shoulder and right lower back) by using one channel per area.
6) Start the session – power, select mode, and ramp intensity
- Power on the unit. If your device has a pre-set timer, set the desired duration (common session lengths: 15–30 minutes; many users start with 15–20 minutes). Do not exceed the maximum recommended session time in your manual.
- Choose the appropriate mode: TENS modes are primarily for pain modulation; EMS modes produce stronger muscle contractions for strengthening or muscle activation. If you are unfamiliar, start with a gentle TENS mode.
- With intensity controls at minimum, enable the channel(s). Slowly increase intensity for each channel until you feel a comfortable tingling (TENS) or a mild muscle contraction (EMS). The sensation should be strong enough to feel effective but never painful. Increase gradually — sudden high intensities can cause discomfort or muscle spasms.
- If using EMS mode for muscle training, choose a program that produces rhythmic, controlled contractions rather than intense, continuous stimulation.
7) During the session – monitoring and tips
- Remain seated or lying down during initial sessions until you know how the device affects you. Do not use while driving, operating machinery, or during activities requiring full attention.
- If you feel sharp pain, burning, or skin irritation, stop the device immediately and remove the pads. Allow skin to rest and consult your clinician if needed.
- If electrodes become hot, peel them off and discontinue use — this indicates a fault or improper contact.
8) Ending a session and removing pads
- Reduce intensity to the lowest setting and turn off the channel(s) before removing pads. This prevents accidental shocks.
- Gently peel pads away from the skin; do not pull the wire. Place pads back on the protective film to keep the gel surface clean for future use.
- Store pads and unit in a cool, dry place away from direct sunlight.
9) Cleaning and pad care
- Clean the unit exterior with a soft, dry cloth. Do not immerse in water.
- Clean reusable electrode pads after use by gently rinsing with a little water if the manufacturer allows; do not use solvents or alcohol on gel pads unless specified. Always return pads to their backing film immediately after use.
- Replace electrode pads when they lose adhesion or the gel becomes cracked or contaminated. Replacement frequency depends on use and care.
10) Charging and battery care (Type-C / USB-C models)
- Use the supplied USB-C cable and a reputable charger. Charge fully before the first use.
- If the device supports use while charging, consult the manual to verify safety — many manufacturers recommend not using stimulation while charging.
- To extend battery life, avoid leaving the device at 0% for long periods and avoid extreme temperatures.
11) Troubleshooting common issues
- Pads not sticking / weak sensation: Clean and dry skin, check pad gel condition, ensure firm pad contact, increase intensity gradually, replace old pads.
- Uneven sensation: Check connections, reposition pads to improve contact, ensure wires are not damaged.
- No power / will not turn on: Charge fully, check power button, inspect charging port and cable, contact support if still unresponsive.
- Skin irritation: Stop use, inspect skin, allow skin to recover, try placing pads in a different nearby location or use hypoallergenic pads; consult a clinician for persistent irritation.
12) When to stop and seek help
- Stop if you experience unexpected pain, numbness, tingling that worsens, severe skin reaction, dizziness, fainting, or chest discomfort.
- Seek immediate medical attention if you have symptoms such as chest pain, shortness of breath, fainting or palpitations.
13) Combining TENS/EMS with other treatments
TENS/EMS is frequently used as part of a broader pain-management or rehabilitation plan. Always coordinate with your physiotherapist, doctor, or sports clinician to ensure the device’s use complements other therapies (exercise, medications, manual therapy).
14) Final practical tips
- Keep a usage log during the first weeks to note which modes, intensities and pad placements provide best relief.
- Start conservatively and adjust only after assessing comfort and effect.
- Keep the original packaging and documentation for warranty purposes. For product help or replacements contact info@tensmachines.co.nz.